
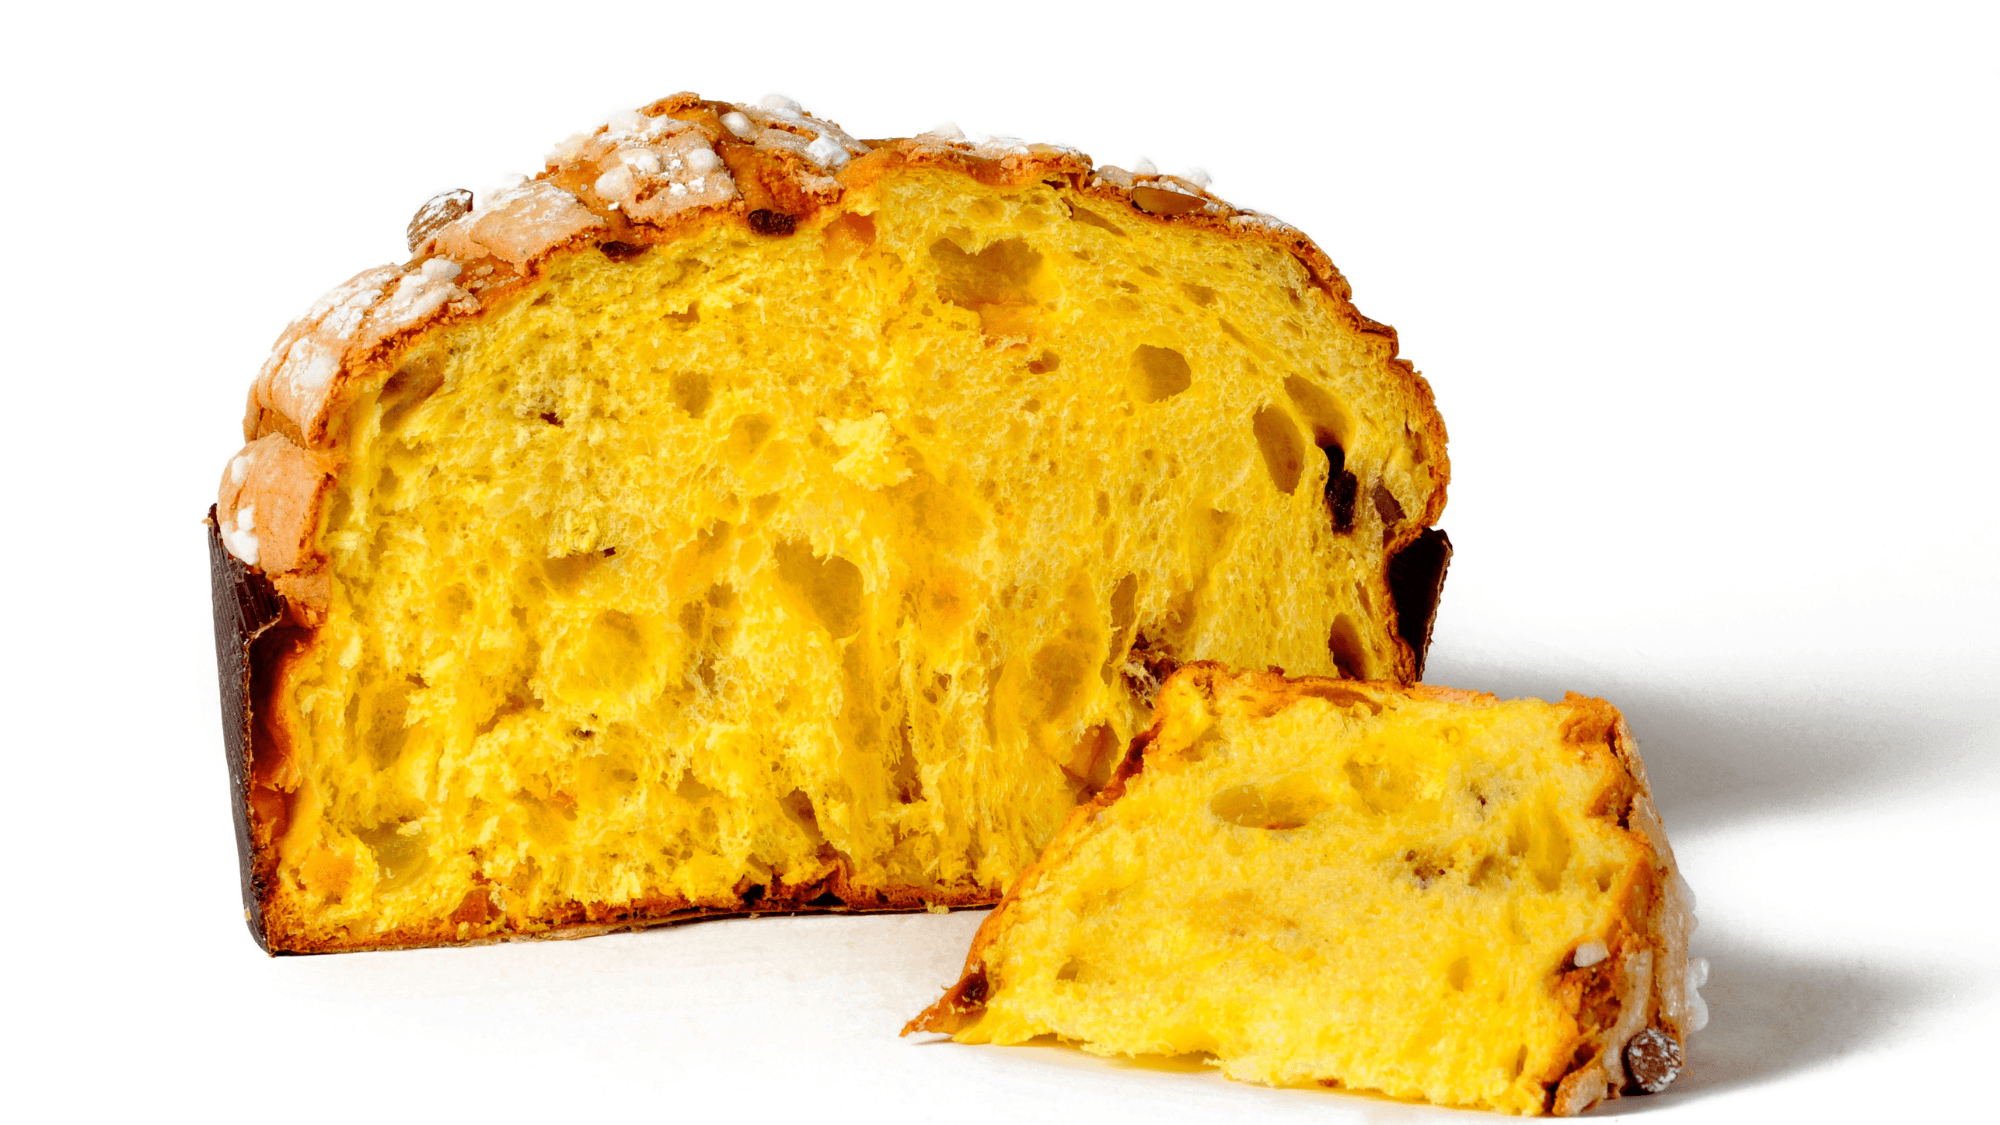
*** NEW RECIPE 2026 ***Colomba is undoubtedly one of the most appreciated cakes during Easter. It is sweet, soft, and has a rich citrus flavor.Colomba's preparation is practically the same as that of Panettone with sourdough starter. The only difference is that it is made with orange candied fruit. Even the flavors are slightly different because we find a fresh note of Orange and Lemon in Colomba, together with the usual Bourbon vanilla.For the Panettone, I propose the classic filling with candied fruit (the best choice), but you can replace the fruit with chocolate chips for baking.I recommend using a well-balanced Sourdough that is not overly acidic. For this reason, I suggest you refresh it every day for at least 5-7 days before making the Colomba to balance your Sourdough properly.If you want to learn all about making Special leavened goods, check out my guide on how to Make Panettone. The same tips and steps apply to Colomba as well!If you do not feel fully confident working with sourdough starter, here is the recipe for Classic Colomba made with yeast instead!
1Kg Colomba Cakes
Equipment
- Stand Mixer
- Immersion Blender
- Metal Skewers
Ingredients
For the First Dough
- 745 gr Panettone Flour (00) ((W360, 14% - 15% of proteins))
- 270 gr Ripe Sourdough (Fed 2 or 3 times)
- 265 gr Softened Butter
- 250 gr Water (a 30°C (86°F))
- 250 gr Granulated Sugar
- 250 gr Egg Yolks
- 80 Clarified Butter (Ghee) (or additional +100gr od softned butter)
- 15 gr Malt Powder
For the Second Dough
- 140 gr Panettone Flour (00) ((W360, 14% - 15% of proteins))
- 165 gr Egg Yolks (well chilled)
- 135 gr Granulated Sugar
- 90 gr Orange Blossom Honey
For the Aromatic Mix
- 130 gr Softened Butter
- 60 gr Clarified Butter (Ghee) (or additional +75gr od softned butter)
- 40 gr Candied Orange Peels in Paste (or 60gr of Flavoring Paste for Leavened Dough)
- 20 gr Candied Lemon Peels in Paste
- 10 gr Salt
- 10 gr Vanilla Bourbon
For the Filling
- 840 gr Candied Orange Peel ((diced))
For the Almond Icing
- 450 gr Granulated Sugar
- 200 gr Egg Whites
- 170 gr Toasted Almonds (non pelate)
- 50 gr Bitter Almonds
- 70 gr Toasted Hazelnuts
- 35 gr Cornmeal
- 35 gr Semolina Flour for Bread
For the Finishing
- Pearl Sugar for Baking
- Almonds (Entire and unpeeled )
- Icing Sugar
Instructions
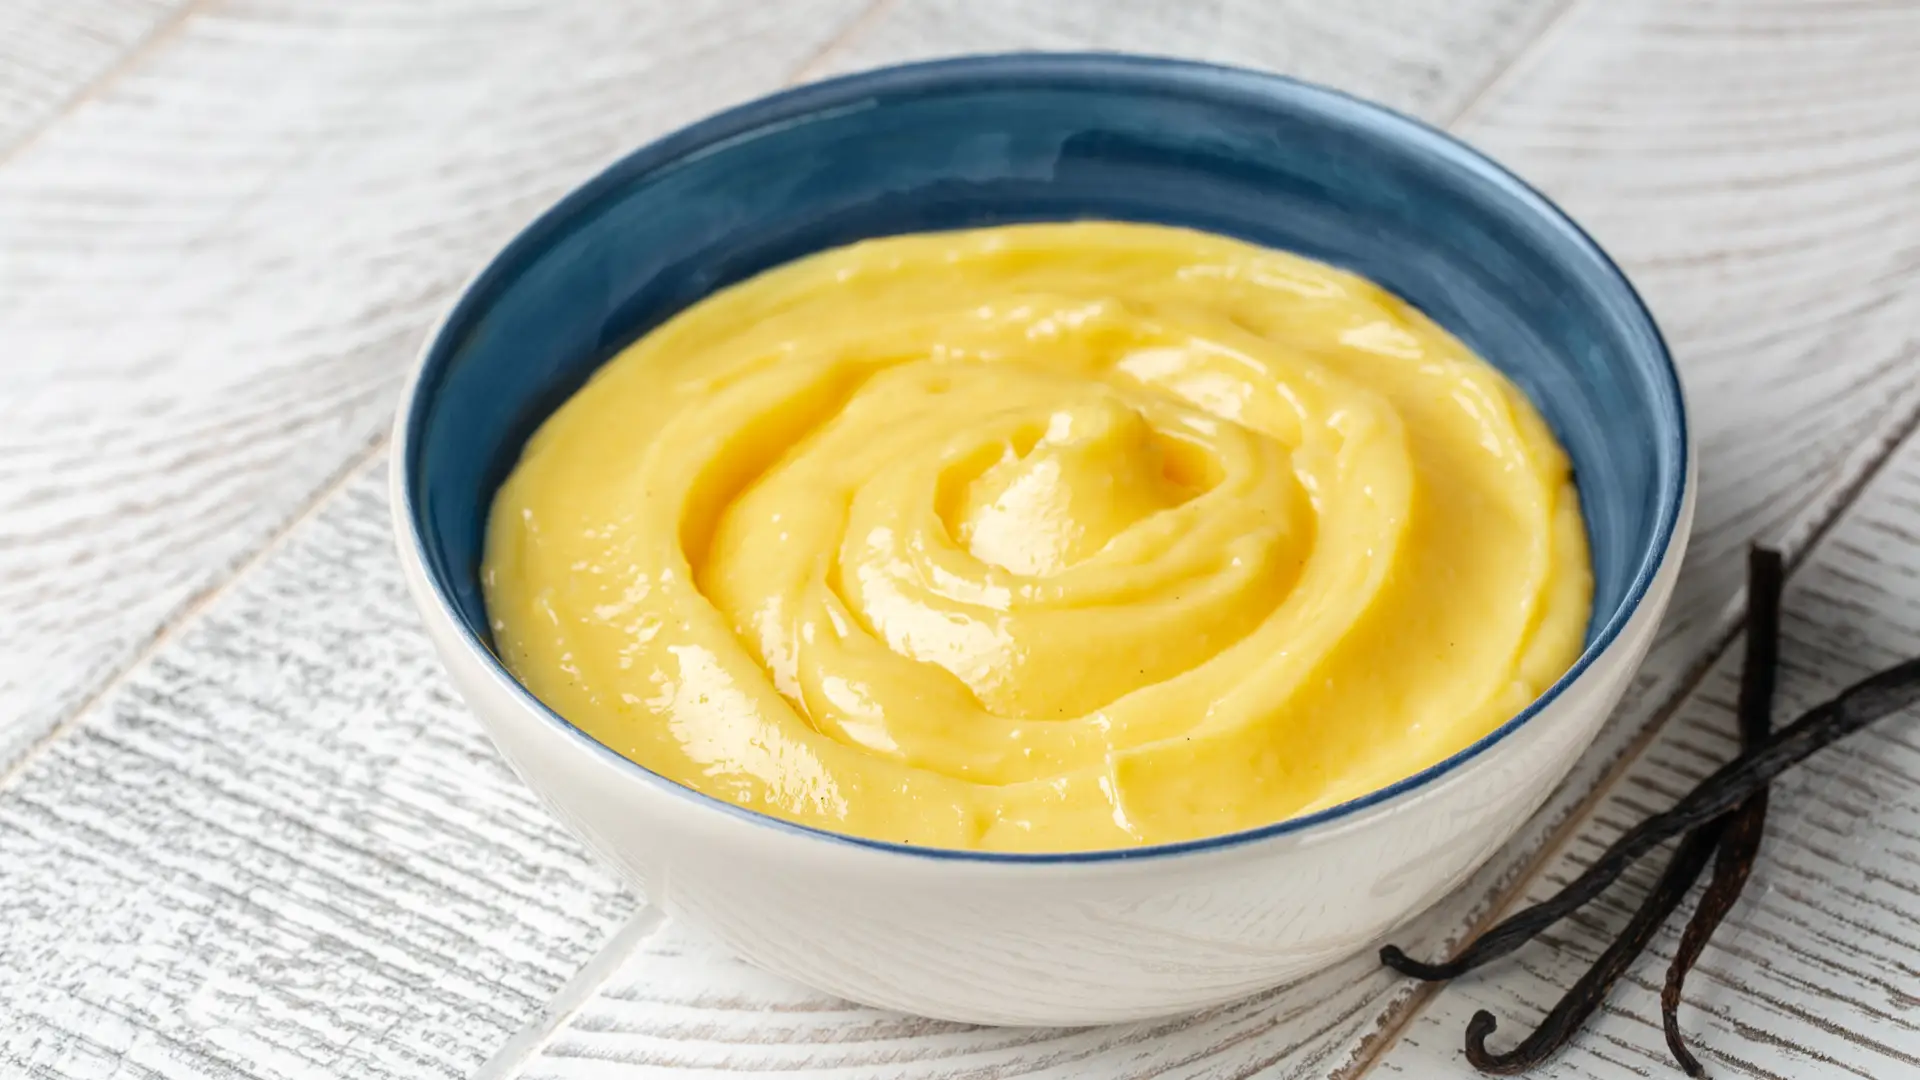
The day before: Aromatic Emulsion and Icing
For the Aromatic Emulsion
- Mix (do not whip) the softened butter, melted clarified butter, salt, vanilla, and the candied orange and lemon pastes (or the aromatic mix you prepared).
- Cover with plastic wrap and refrigerate for at least 12 hours. Remember to take the emulsion out at least 2 hours before using it in the second dough.
For the Icing
- Blend the almonds, hazelnuts, bitter almonds, and sugar very finely to get a fine powder.
- Then mix this powder with the fine corn flour and the durum wheat semolina.
- Add the egg whites, lightly beaten (not whipped), and mix until you get a “creamy,” fairly fluid mixture.
- Cover with plastic wrap and keep the glaze in the fridge until ready to use.
For the First Dough
- First, make a syrup: use an immersion blender to dissolve the sugar and egg yolks in the 30°C (86°F) water.
- Pour the syrup into the mixer bowl and add the sourdough starter at its second or third refreshment.
- Mix for a few minutes to loosen the starter before adding the flour.
- Add the flour and the malt, let the dough come together, then stop the mixer and let it rest for about 45 minutes for autolyse. This helps you get a more elastic dough and makes the next steps easier.
- After the autolyse, resume mixing until the dough develops a strong, elastic gluten network. Check gluten development with the windowpane test: stretch a small piece of dough into a thin sheet. If it doesn’t tear easily, the gluten is well developed.
- Once the dough is well developed, add the softened butter (room temperature) and the clarified butter in several additions, letting absorb before adding more.
- The first dough is ready. Transfer it to a large container, dot the surface with a few small pieces of butter, and let it rise at 22–24°C (72–75°F) for about 15 hours, until it has tripled in volume. Rising time depends on room temperature, so before moving on, make sure it has tripled. For an easy visual, mark the starting level and the target level on the container (starting volume + twice the starting volume).
For the Second Dough
- Put the first dough and the flour into the mixer. Start mixing and let the dough come together very well, until it forms a strong, elastic gluten network.
- Add the cold egg yolks and mix until fully absorbed.
- Then add the sugar and the honey. Keep mixing until the dough is smooth and releases from the sides of the bowl again.
- When the dough is homogeneous and relatively dry, check the temperature with a thermometer: it should be below 26–28°C (79–82°F). If it’s warmer, cover and chill in the fridge until it drops to around 20°C (68°F).
- Add the flavor emulsion you prepared the day before, in several additions, letting it absorb fully each time.
- Once the dough is well developed, add the drained candied orange cubes and mix very gently for a few minutes.
- Let the dough rest for about 1 hour to relax the gluten and complete hydration.
- Turn the dough out onto a buttered work surface and divide into the desired sizes: for 1 kg colombe, portion 900 g pieces of dough and let them rest on the bench for 5 minutes.
- After 5 minutes, shape into rounds: fold the dough over itself, then tighten the base to create surface tension. Let the rounds rest for another 15 minutes.
- Divide each round into two pieces: a larger piece (about 2/3 of the dough) and a smaller piece (about 1/3 of the dough).
- Use the larger piece to form the “body” of the colomba. Stretch the dough gently and fold it over itself like you’re doing letter folds. Then roll it lightly into a log and place it in the mold lengthwise (head to tail).
- Form the “wings” with the remaining piece. Shape another log and place it crosswise over the central body to form a cross.
- Proof at 26–28°C (79–82°F) for 5–6 hours, until the dough reaches about 1 finger below the rim of the paper mold.
- Spread about 100 g of the amaretto-style glaze (made the day before) over the surface.
- Sprinkle generously with pearl sugar and a few whole unblanched almonds. Finish with a light dusting of powdered sugar.
- Bake in a static oven at 150°C (302°F) for about 50–55 minutes. During the last 5 minutes, crack the oven door slightly (use a small ball of aluminum foil to keep it ajar) to release excess steam.
- To check doneness, the internal temperature should be about 92°C (198°F).
- Once baked, insert the skewers and invert the colombe for at least 2 hours.
- After that, turn them right side up, remove the skewers, and let cool completely for 6–8 hours before packaging in food-safe bags.
Nutrition
Serving: 1Colomba Cake | Calories: 4177kcal | Carbohydrates: 605g | Protein: 64g | Fat: 175g | Fiber: 17g | Sugar: 415g | Net Carbohydrates: 588g


21 comments available
Buongiorno, ho tutto eseguito come la ricetta. Metto in forno statico a 150* , la mia colomba non gonfia, e mi ritrovo con un cake, nemmeno brioche… e nemmeno cotta bene…
a cosa e dovuto? Avro lasciato troppo lievitare il seconde impasto? Lo lasciato 8 Ore invece di 5-6 ore
Grazie
Ciao Dona!
hai avuto problemi nel fare il secondo impasto? magari l’impasto era appiccicoso?
I problemi potrebbero essere diversi: Da un’eccessiva acidità del secondo impasto, alla spinta del forno. Molto probabilmente se la colomba ha necessitato di 8 ore per lievitare nello stampo, molto probabilmente è un problema di lievito!
A presto!
Salve ,ma il burro chiarificato posso sostituirlo con quello che trovo al supermercato? Grazie
Ciao, il Lievito Madre deve essere al 30% di idratazione o un’altra percentuale? Grazie mille!
Virginia
Ciao Virginia,
se conservi il lievito madre in acqua, si, lo rinfrescherai al 30%
A presto!
Ciao, se faccio le colombe da mezzo chilo come posso regolarmi poi per la cottura? Come temperatura e tempi intendo! Grazie mille!
Roberta
Ciao Roberta,
la temperatura e la modalità di cottura rimangono le stesse. Per il tempo puoi regolarti sui 35-40 minuti circa.
Inoltre, usa sempre un termometro per verificare che la temperatura al cuore del prodotto sia di 92°C per essere sicura della cottura!
A presto!